

D.I.Y. Updated Kitchen Cabinets (Part 2) | Home Tour


When I ended part one I was still sulking in the corner of my kitchen, staring at my DIY disaster. Luckily, there is an easier alternative to sanding...PAINT! I have never been opposed to
painted cabinets but since we already had all white appliances, white counter
tops, and white-ish back splash...white was out of the question. I didn't
want something as dark as black. I LOVE colorful cabinets, but {like most of my
projects} I consider both my "style" and resale to a certain extent
since I know this will not be our house forever. Then I saw a picture of this
home online and became obsessed with how good the dark gray with white counter
tops looked. I didn't want them to look too modern for our
traditional/contemporary style home, so I decided I would used a glaze to give
them a little of an "antiqued" look.

We had already sanded, so we no longer needed to do that step....just degrease and wipe them down with a damp cloth. We were advised to use an oil-based paint because it is more durable. Little did I know that latex paints have made big steps over the years....
TIP 1: As you take off your doors/drawers, find a way to number
them in order to make sure you know where to put them back. Also put all
hardware in a ziplock bag to make sure it doesn't get lost in the D.I.Y.
craziness.
TIP 2: If you are painting your
cabinets white, use a primer and then latex paint...oil-based white paints tend
to yellow over time.
Our oil-based paint was much thicker
than the oil-based primers I have used; it took FOREVER to dry because it was
cold. The brush strokes and bubbles from the paint were also showing when
dry.
TIP 3: If you have access to a paint sprayer, it may be messier
but is well worth it since it saves you time and you avoid brush strokes
{although I am sure they come with other problems}...my mom informed me once
our job was done that she had one...not cool Debbie.
TIP 4: To thin oil based paint or primer in the winter and extend its drying time in the
summer use a product called, Penetrol...it worked wonders! We couldn't see out
brushstrokes afterwards.
TIP 5: Do NOT shake oil-based paint/primer to mix it before painting! Shaking
will cause the bubbles, while stirring it with the paint sticks leaves it much
smoother.

We taped up the cabinets and rolled the
paint on with a small foam roller made for cabinets, and would then quickly go
over it with a high quality brush to take out any bubbles and fill in the
corners/cracks. After each use we would just throw the roller and clean the
brush WELL with mineral spirits. I also wore a respirator mask and gloves
because I found out I was pregnant half way through this project and was
cleared by my doctor to paint that way. Lightly sand in-between the two
coats with a 220 grit sand paper.
TIP 6: Take your time and use good lighting so you can see and
correct any mistakes BEFORE the paint dries.
Read the back of your paint can to see how
long you need to wait between coats. If I could do it again, I would do 2 coats
of primer and 2 coats of latex in the color of my choice {semi-gloss for a
little shine or satin for a more matte finish; sanding in between coats}.
For antiquing, I bought one
container of clear glaze from Lowes and mixed the amount directed with a sample
size of the Valspar "almost black" paint because my gray was so dark. I antiqued the creases of the cabinets, drawers, and trim using a triangular sponge and a dry cloth for wiping.
TIP 7: The more glaze you mix with the paint, the thinner it will go on...the
less glaze you use with the paint, the thicker it will go on and less it will
wipe off.
TIP 8: Experiment glazing with a small section {maybe hidden} to see what
affect you want...keep a damp cloth with you to wipe off immediately if you
don't like it.
To cap it off and make sure everything stays
in place, I did two coats of Polyurethane, in Satin finish...always put a clear
coat on furniture and cabinets.
TIP 9: Make sure the clear coat you choose does not yellow over
time, especially if you are using white/light paint.

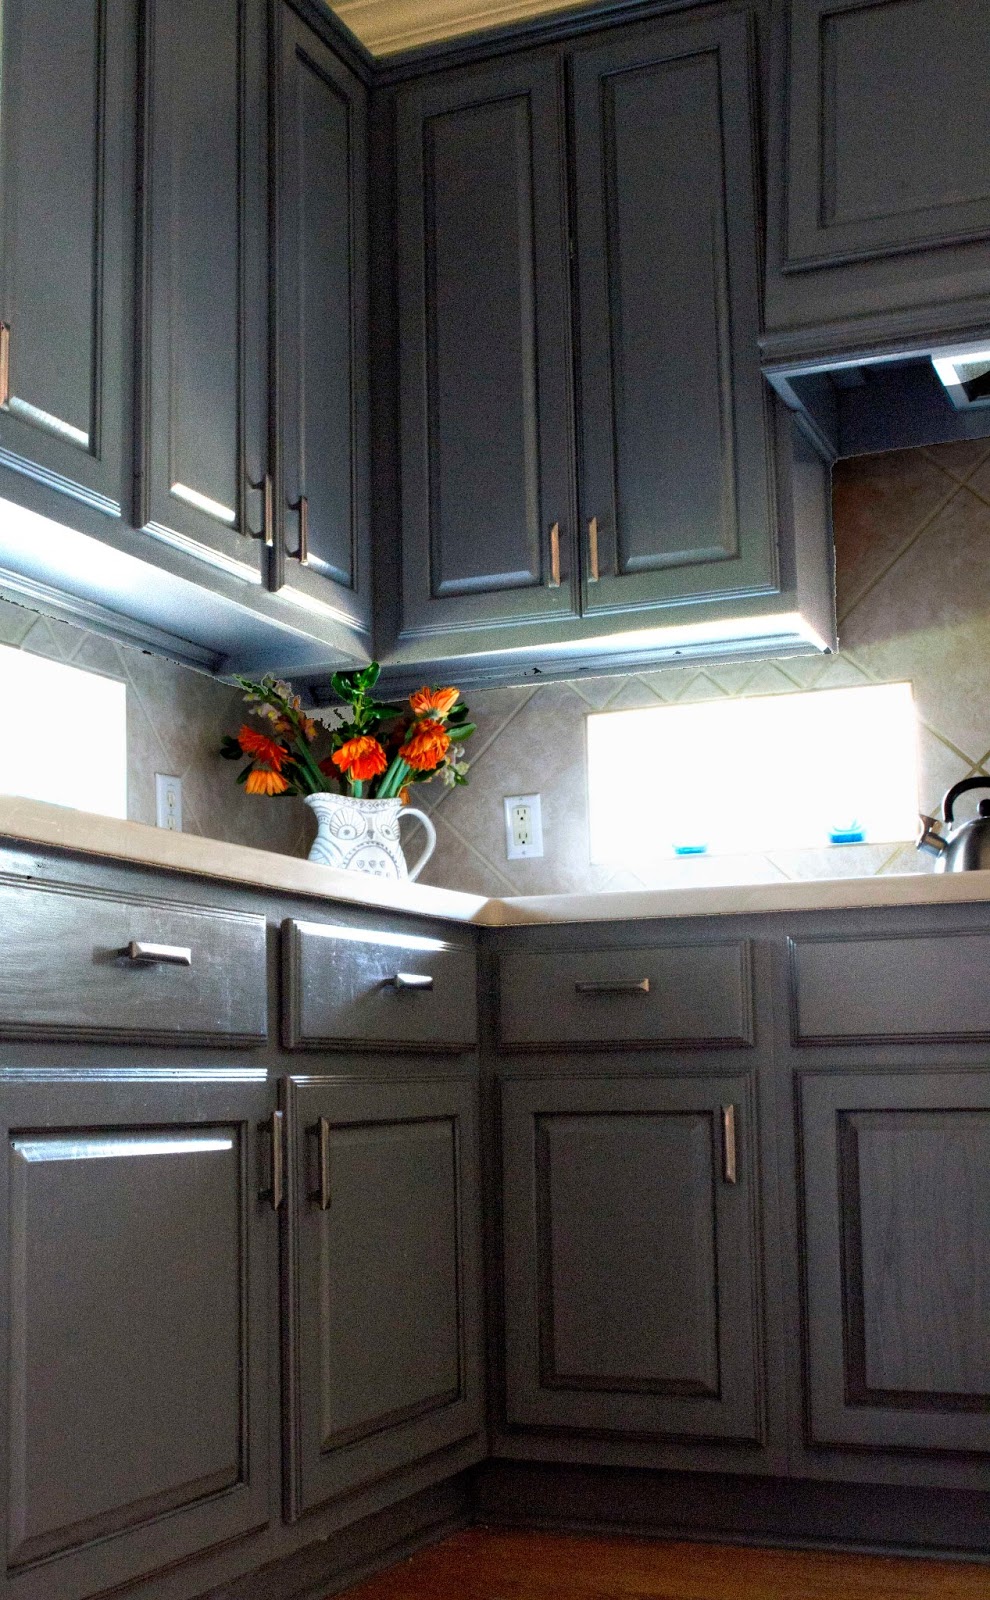
To avoid the modern gray/chrome/white
kitchen look, we chose a dark metal/copper drawer pull from Lowes...and I LOVE
it! Done and will NEVER do it again...at least in this house. Hope this helps
you in your future kitchen re-do's. Painting the cabinets is an in-expensive
way to update your kitchen quickly.

Paint color: Walmart- Chimney Smoke- Satin
Glaze from Lowes mixed with a
sample of customized black valspar paint
Polyurethane water-based clear
coat in Satin
Cabinet pulls: from Lowes
Recommended primers: Zinsser Oil-based Primer (high odor though) OR
Kilz Oil-based Odorless Primer
(less odor)...or you can use water-based
Recommended Clear Coats: (based on others tutorial recommendations) Varathane
Interior Water-based Polyurethane