Uncategorized Nikki Uncategorized Nikki

Because I Love You | Free Valentine Printables

I whipped up a few Valentine printables for our gameroom shelves. Just click on the pic to pull up and download the 8x10 or 12x12 print for free. If you're on instagram I would love to see how you used the print; tag me @ntag1.

Also, I would love to hear what kind of art you love or wish to see for nurseries, kid's, and teen's rooms. I'm starting on a project that I think you'll love and your input will make it even better!

XO,
Nikki

Read More
Uncategorized Nikki Uncategorized Nikki

2015!

Over the years I have gone from welcoming the new year with a list of resolutions of what I want to do, to a few simple resolutions of the type of life I want to live. Change is always uncomfortable for me; heck, I think it is for most people. I once heard a saying from a friend, "when it comes to change in humans, slow is fast". For me that could not be more true, so while the idea of the first day of the new year being like a restart button and suddenly everything changes sounds great; in reality I know that these resolutions will be a commitment I strive for each day of the new year. Maybe by 2016 I will be one step closer to the person I want to be.

Balance and no expectations are my resolutions. After having Julip and going from a full-time working mom of 1 to a part-time work-at-home mom of 2, I am still dealing with a lot of change. There are days when it seems like I try to do too much and days when I feel like I dominate. I am striving for balance in raising my children and pursuing my design career. My worst fear would be to be spread so thin that I stop excelling at these items I feel so passionately about.

I still have my list of personal, family, and business goals but will not put unrealistic expectations on myself. I will also not limit myself; simply live each day for what it is and try my best.

2015 is already proving to be a year of tests and growth for me. Along with goals to grow Mini Magnolia Designs, my online design business, there is also a strong chance we will be moving to another state. We first found out about a possible move when I was still pregnant. Since then the locations and dates have changed, but the chance of a move is about 90%. To say that I'm nervous about moving away from the support of family and friends to a state up North, where it snows, is an understatement. 

After changing a lot about the current house we live in, the thought of another house to make my own both excites and exhausts me. I had already bought wallpaper and lights for house updates when we got the news, so I am anxiously holding onto them until we need to make our next house a "home". I would appreciate the prayers and will keep you updated on the progress of our move.

Before we leave I am finishing up a collaboration on the design of a small restaurant space. We start demo this week so I cant wait to share what's in the works! Happy 2015!

xo,
Nikki

Read More
Uncategorized Nikki Uncategorized Nikki

A Christmas Playroom | Home Tour

Have you ever had (or have now) a room the is in-between every other room and serves multiple purposes? Rooms like that are some of the toughest to make a usable space out of; ours is about 90% done (still need a cool light) so I figured I would finally post it decorated for Christmas.

When we moved into our house we had a room at the top of the stairs, in the middle of all of the guest rooms. We had no kids yet, so it was the designated "man room". It was the one room Matt could put his posters and hunting decor in. It basically sat there, unused, with taupe walls and a beige hand-me-down couch that was ripping at the seams until we had baby #1. 
When we needed a nursery our office had to move to the man room. There was a niche that fit Matt's old garage sale desk perfectly. I loved the rough wood look of the desk, but took his childhood chair and painted it green to offset the wood. We also had some brown floating shelves that were moved next to the desk. When the walls were painted I took the white and painted the shelves, then added gold to the edges later.

 About 1.5 years ago I decided I was going to take that poor room into may own hands and start giving it a face lift. I installed a small chair rail and painted the walls white on the top and Benjamin Moore's Witching Hour on the bottom...while listening to reggae music and dreaming of a beach vacation. It made a HUGE difference in making the room feel larger and brighter! I will say that I wish I would've gone a little bit darker on the bottom, as this color can look slightly navy in certain light.  

I then tossed the couch and slowly started trying to make the room a usable playroom/man room/office. It really doesn't host the guys much, but I needed to leave up some of Matt's decor so he still feels like it's his house haha.

Then with baby #2 my large, brown Ikea shelf had to move out of the soon-to-be nursery. I didn't want it taking up precious wall space, so we used it as a divider. It felt so dark and heavy so I painted the outside white and it really helped to blend it with the walls. In order to make it toddler friendly we bought some threaded metal pipe and attached it to the wall, leaving a one foot gap in between the wall and shelf. We can now use the shelves from the room and the hallway, and the room feels like it's own space now rather than an extension of the hall.
There's a mix of man art and kid's art. I wanted to put a jack-a-lope in Julip's nursery but didn't want to pay so much for one. Then, I saw LayBabyLay's instagram with a paper mache one and found this tutorial to make it. I think Joni has since put up her own tutorial. 
Abram loves his Ikea table and chairs and his teepee that we got from Amazon. I added washi tape to the poles and some ribbon to the opening. I also took a small, useless table we inherited, cut it shorter, and attached a tray from Target to make it a usable side table with a little interest.
I hope you have enjoyed seeing it as we are enjoying actually being able to USE it! 
xo,
Nikki
Read More
Uncategorized Nikki Uncategorized Nikki

Free Christmas Printable

Happy Cyber Monday! I hope everyone enjoyed their Thanksgiving holiday. We always go to visit my family...9 hours away (10 with kids). I just got in late last night and am playing catch up today. 

Right before we drove home I realized I forgot to take a generation pic with my granny (who Julip is named after). She is 100 years old...5 generations in this pic. We may not look our finest (travel attire), but this is a keepsake picture for sure.

Before I left last week, I decorated the playroom (which is about 90% finished) for Christmas. Included in the decor were some simple Christmas prints I made. While I am busy editing the playroom pics to share later in the week I figured I would "gift" everyone the Christmas prints just in case they need one last thing to finish off their Christmas decor. Just click on the picture to pull up the 8 x 10 pdf printable. Need a larger size? Email me (under the contact tab) and I will get it to you.

xo,
Nikki

Read More
Uncategorized Nikki Uncategorized Nikki

A Very Mini Magnolia Christmas!

If you or someone you know is seriously in need of a new nursery, child/teen room, or playroom but doesn't know where to start then e-design may be the answer you are looking for!
My Mini Magnolia Designs website is still under construction, but I am starting to take on new and exciting custom designs for your mini's. 
For the next three weeks (through December 2nd) you can get my Design Suite Package; specially wrapped and shipped for whomever you are buying for. Due to the custom nature of my designs and the time and attention I dedicate to each client, there are only 7 spots available and it is first come, first serve!
What's inside the pretty packaging?
- 3 example boards to show my work and explain how the process works
- 1 voucher for a custom design of the room of their choice
   - Design Suite includes:
        * A design inspiration board customized to fit your budget and needs
        * A detailed shopping list for all specified items
        * Recommended Paint Colors
        * A design report with the concept and customizable options for your space
        * A Floor Plan
        * 3D Room Layouts showing the placement of everything
        * One round of alterations after the initial design is provided
The price for everything (including shipping) is $350
E-mail me at info@minimagnoliadesigns.com or leave your e-mail in the comments on this post, facebook, or instagram and I will paypal invoice you. Once you have paid I will ship your "design in a box" within a week to the address of your choice.
xo,
Nikki
Read More
Uncategorized Nikki Uncategorized Nikki

Master Bedroom Refresh | Home Tour

       It is my firm belief that a home is always evolving, much like life, change is the only constant. It can take months to years to develop a room if you're on a budget. Our home was our first out of college; actually I was in my master's program for 3 of the 6 years we have been here. We started out with very little money, very little time, and lots of hand-me-down furniture. We were so grateful for the furniture our families gifted us, but started to infuse our personalities and sense of style little by little.

       Our master bedroom was the first room we painted when we moved in {can't find a pic of the before right now}. Honestly, if I could paint all my rooms every year I probably would, but Matt HATES to do it. Over time I have been trying to make our bedroom look put-together on a small budget since it is not seen by others often.  Right before I had Abram I did a refresh and then again before I had Julip. I still loved the golden color, but needed something to brighten up the room and add some interest to the "focal" wall.

 
              Some of the biggest challenges were creating a cohesive look with a mixture of pieces obtained at various times, and combining the masculine and feminine touches so that my husband feels like it is his room too. The picture above the bed is actually a Persian rug of the Iranian army from the past. Matt bought it on one of his trips to visit family in Iran before we ever lived together. For a while it resided in his "man room", but got kicked out when it had to become more of a play room.  Matt was a good sport and said it could go in storage, but I thought it would be nice to have something more grande over our bed. He was thrilled! It helps to balance out the floral elements and now I think of them as our personal army watching over us while we sleep. ;)

       All of our furniture and finishes have to stand up to kids and dogs. The bedding was something that was a real challenge for us since our 65 lb. hound dog sleeps with us. She has black hair than can show easily on white bedding, and anything too delicate gets beat up pretty quick. I know I know...we need to stop the bad habit, but we are softies. We found the turquoise quilt at Target and it was perfect! It can add a pop of color to the room, or be flipped to the other side for a fresh, textured white. I got the bench at Garden Ridge, in high school, when it had zebra fabric. I covered it with this faux leather my Senior year, and have been wanting to cover it again. Until I get the time, I settled with throwing this fur rug from Marshall's on top.

       The dresser was a craigslist find. I actually got it over another woman because the seller was so aggravated that the other woman kept shoving it in her face that she was a designer...shhh don't tell. I ended up telling her my secret when I picked it up and we had a good laugh. I got the bedside tables from Homegoods and they were two different colors. I painted them and changed out the knobs with some found at Hobby Lobby. The lamps and basket are also from Homegoods {a long time ago}, and the mirror is from Ikea.

       The white framed pictures are of our parents and grandparents wedding days. They were all framed for our wedding and were then put on our wall, along with my "key to my heart" graphic.

Still on the wish list:
- Another piece of bedding to layer with the quilt
- A possible rug to add some texture
- A different fan that adds some style
- Cover the bench
- Possibly cover the headboard
- Rearrange/add art to the dresser

 xo, Nikki

Read More
Uncategorized Nikki Uncategorized Nikki

Free "Don't Stop Make Believin'" Printable

Whenever I make simple graphics for my rooms I like to make them available to anyone so they aren't limited in created their dream space. I made a couple versions of the "Don't stop make believing" art print above the crib in my Make Believe Nursery.

You can download the 8x10 PDF by clicking the name above the image.

I framed a larger version for my nursery, but you can transfer it to a canvas or do anything you can dream up! For a larger version, you may e-mail me at the address in the "contact me" link above.
Enjoy!
Nikki

Read More
Uncategorized Nikki Uncategorized Nikki

Nursery 2 Details

       This nursery was a guest room and the room where junk came to collect. I do everything on a budget so when I wasn't re-using pieces from Abram's nursery I tried to DIY or buy from discount stores. 

       We moved the full size bed into Abram's room with a new frame {his toddler room update is coming soon}, and moved his crib into the nursery.  I also used the glider we had in his room and shopped my house for other decor.

       I made a simple, faux suede skirt using the tutorial I had posted for the previous nursery. I also made the "make believe" print above the crib and will be posting a free printable of this one and another version on the blog soon.

Paint Color: Benjamin Moore "Creme de Mint"

Ceiling Fan: Modern Fan Company Halo Energy Smart Fan 
I really wanted a chandelier like this one from Ikea, but it was too long. Then I a few more options like this one from Etsy. We were going to do a separate table fan since the room is upstairs and it gets HOT in Texas. After doing some research and not feeling comfortable with the fans and little kid's fingers, we went with this modern fan. We LOVE it! You can barely tell it's a fan because of the way the blades are mounted.

Crib: Jenny Lind Davinci

Crib Sheets: Land of Nod
my alternate {not pictured}: Etsy

Pillow in Crib: H&M

Curtains: TJ Maxx

Curtain Rod: Ikea

Wooden Bird Feeder: Target
Glass Feather "Bubbles": Red Arrow
Flamingo in Boots Print: Etsy; in Ikea Frame
Don't Stop Make Believing Print: I made {diy coming soon}; frame from my house
Dance Party Print: Society 6; in Ikea Frame

Throw Blanket: Ikea

Frog Statue: TJ Maxx {also saw at Home Goods}

Wall-mounted cabinet: Ikea with one of these doors

Paper lining back of shelf: Paper Mojo adhered to some matte board and inserted behind the shelf.

Mirror: Inherited from my great grand parents with a bedroom set and painted it gold

Branches: Had in my house already, but similar at Hobby Lobby; butterflies from Hobby Lobby
Branch Container: Target
               
Basket on shelf: TJ Maxx

Alice in Wonderland Babylit Book: Amazon

Alice in Wonderland Hat: Etsy and I love that she can use it for dress up later.

Cup and saucer: Hobby Lobby and I will be replacing those with some handed down from Matt's grandmother.

Headband Container: Poppytalk for Target

Picture: Matt ordered the "Mother's Love" print from Kelli Murray and this came as a free gift {smaller than the one for sale}. I loved it so I framed it for our baby girl. {Frame from TJ Maxx}

Dresser: inherited from my Great Grandmother and was painted "Black Raspberry", from Benjamin Moore...original drawer pulls.
Changing Pad Cover: Target

Glider: Walmart

Fur rug: Marshall's

Pillow on the chair: I found on sale at Target for $5
Owl: a gift from my mom {from Pier One}
Beautiful Girl Print: Matt had to have this for her; from Hobby Lobby
Mermaid picture: I already had this in the guest room from Garden Ridge years and years ago.

Rocks in frames: When I was younger I was a HUGE rock collector. My box full of smaller rocks has been sitting in the attic for years, so I pulled it out and used some of my collection as the decor in some shadow box frames from Ikea.

Toy Baskets: I really wanted some type of toy baskets that weren't a typical shelf so I found some large candle holders at Garden Ridge, painted them gold, and mounted them sideways to the wall. They remind me of something you would see at the bottom of the ocean.

There you have it; Julip's nursery details! If there is something I missed feel free to email me!

xo,
Nikki

Read More
Uncategorized Nikki Uncategorized Nikki

Don't Stop Make Believin' Nursery | Home Tour

       A full 6 weeks after having our little girl I finally "finished" her nursery. If you've seen my first nursery for our son, you know that I try to mix and match elements to allow the room to evolve so it is never really finished. I also don't love specific themes, just general ideas to give me direction. My son's nursery was all about adventure and being "wild and free". I seriously thought about doing a gender neutral nursery this time around, but quickly realized that this may be my only chance to be "girly".
       When I had just found out I was pregnant, and didn't know the sex, I walked into West Elm and fell in love with the displays of moss, butterflies, and lights. I didn't want a woodland themed nursery, but there was something so ethereal and imaginative about the feel the display created. I really wanted my daughter to use her imagination, so I thought of "make believe" as a general guide to help me in my decision process. Starting with an idea is sometimes harder than finding a piece of artwork or fabric. I knew I wanted a purple, mint, blush pink, white,and I was obsessed with a black and white dot patterned wallpaper so I made an inspiration board to get started.
       Matt would not let me wall paper so I started painting dots on the wall, in black {bigger than I originally wanted}. After we finished an entire coat I felt like the black was too harsh against the mint since I wanted the room to feel fresh. I decided to change them all to gold and to paint the dresser {inherited from my great grandmother} a dark, moody purple so it would pop.
       The nursery has a mermaid, a dancing bear, a prince frog, a flamingo in boots, toy baskets that remind me of something at the bottom of the ocean, a mad hatter hat, twinkle branches, feathers in "bubbles", a mirror on the wall, and rocks I collected as a kid.
              Mixing pattern, texture, and several colors will allow me to transition things in and out as she grows. The song quote above the crib is not only a play on the "theme", but also ties into our Louisiana roots; the LSU band plays it at every football game. I think it all came together nicely and is girly enough without being "princess."

xo, Nikki
Read More
Uncategorized Nikki Uncategorized Nikki

Land of the Free | Outfit to Room

July is always a crazy month around here with the 4th, my birthday, and Matt's...now add some serious nesting into the mix and we all might as well just run around the house screaming and dancing...it gets crazy!

"Pixie's" nursery is about 85% complete as far as work goes. I'm waiting on some back-ordered curtains to come in before I continue with the artwork and finishing touches {gotta make sure I like it all together}.

I have also been really into fresh, beachy, gender neutral nurseries lately. Maybe it's because of summer or that I am inspired by the upcoming holiday. I decided to put an inspiration board together to show how inspiration can come from anywhere.

If you've read anything about Abram's nursery and my design style you will know that I'm not into themed nurseries/rooms. I actually do use some sort of theme most of the time, but only to guide my ideas into something more. This board is a great example. I was inspired by the outfits, the 4th, the beach and thoughts of summer; I love that it is not in-your-face red, white and blue.

The chandelier is my "firework" and the mixture of glam, gold accents with natural elements is a great way to achieve a balanced, neutral look without being too mundane. Enjoy.

Have a Happy Fourth!!!
Read More
Uncategorized Nikki Uncategorized Nikki

Backyard Progress | Outdoor Inspiration

I haven't shown many pics of our backyard because when we moved in it was horrid. Seriously. It was a slab of concrete, an ugly palm, and hot hot sun {no shade}. We never went out there.

A couple of years ago we made a flower bed by our master window with azaleas and a magnolia tree. Then, last fall we tackled the back corner flower bed. We added four trees that are still maturing, but will hopefully provide some shade. We cut down the palms and most of the holly bushes, and raised and completely replanted all new plants. Most have started to come back this spring and I am so anxious for them to fill in and give us some color!
On the agenda for this spring:
  • Build the hard top gazebo we bought 
  • Extend our porch with some pavers to give us a place for the gazebo and soon-to-be furniture
  • Finish the rock border around the beds
  • Get a sandbox
  • Oh and yes, the house needs to be repainted, but that is on another to-do list. 

I am desparately trying to make our backyard a place we can enjoy as a family. If you follow me on pinterest you may have noticed that I have been pinning some outdoor inspiration like a mad woman. Here are some ways to liven up your backyard this summer:

Create some imaginative areas for kid's activities. I LOVE this playhouse...I actually love their whole house.
Spaces for gathering in the shade allow you to stay out without feeling too uncomfortable. I have always been obsessed with the back porch at the Hunted Interior. LOVE the live edge table and pops of color!
Find and group plants that give you some color at different times of the year; colorful leaves, flowers, berries, etc. I tried to do groupings in our backyard...verdict is still out on how well I did.
Shade and lighting...enough said. 
Oh and I have got to get my hands on a swinging chair or hammock. My grandmother offered me her 2 vintage swinging chairs and I cannot pick them up fast enough!
Read More
Uncategorized Nikki Uncategorized Nikki

Daily Life Pics and Headboard for Grabs...on the side of the road

We have been in full baby prep mode over here. Yes, I know I am only 24 weeks but my nesting phase is much stronger this time around. I suspect it's because I am working and really can't get much done during the week. I have also had a lot harder time getting nursery inspiration for this little chick. Last time I had a lot of stuff that I pulled from other areas of the house, but with this one I am pretty much starting from scratch. My anxiety level got so bad that Matt met me at a fabric store last night to look for inspiration {hence the day-late post}.
Part of bringing another human into the world comes the task of clearing out a room for them. Luckily our house is big enough. When we moved in we had enough bedrooms for the amount of kids we want, not because we are great planners like that, but because a two-story house was cheaper than the smaller, one story houses we were looking at...have I told you we are slightly frugal?  I have tried not to fill the rooms too much, but I have filled the closets with storage stuff and the rooms became a collection of the projects and crafts I did in college. Saying goodbye to those things has made me a little bummed. I know they are things, but some are models and boards I spent countless sleepless nights on...and one thing I am really dragging my heels with is my upholstered headboard. 

When I first moved on my own, in college, I decided I wanted a chartreuse headboard to go with my dark purple/brown walls. I still love that room and headboard to this day. I figured out how to make it before the days of pinterest. I used the wrong type of thread to pull the buttons tight, I didn't have a staple gun to upholster so I bent finishing nails to hold down the fabric, and I didn't cut the mdf to make it lighter; I just used the whole monstrous piece. It was totally a "work with what ya got" moment and after 2 moves {both with sets of stairs}, and Matt and his brother breaking their back carrying the mdf and getting stabbed by the nails and cussing me out, I must say good bye to my rigged headboard. Matt is jumping for joy, but I might just spend one more night sleeping against the soft padding. Just a representation of my life and emotional state at the moment...I used to be a project badass, today I'm just a round, blubbering fool.  ;)
I would say come pick it up if you want it, but your husband might hunt me down.
Good thing I have my little man to distract me. Daily Life: A pic a day- Week 2

xo,
Nikki
Read More
Uncategorized Nikki Uncategorized Nikki

Weekend Project: Recovered Accent Chair

I inherited a fabulous bedroom set from my Great Grandparents after they passed away. I love love love the lines of the furniture, but the yellow-white color...not so much. I am trying my best to hold off on repainting most of it to not upset my grandmother {for now}, but the chair that came with the set needed some help asap.

It was nothing a can of gold spray paint and some cheery fabric couldn't fix. 
I would say that this tutorial is for a chair that has separate seat and back cushions.
Supplies Needed:
Chair
Spray paint {color of your choice}
Staple remover
Screwdriver
Staple Gun
Fabric {yardage depends on the size of your chair}
Trim of your choice
Hot glue gun
Approximate Time= 8 hours

Step 1:
Disassemble. If the assembly is complicated, photograph the pieces as you take them apart. I unscrewed the legs from the back and seat.

Step 2:
I went ahead and spray painted the first coat on the the legs so it could dry while I upholstered the fabric pieces.

Step 3:
My seat and back padding were in good condition, and my fabric was a neutral so I left it all on. BUT, if the fabric or padding are in poor condition, then you will need to take that apart and replace it. If not, just do what I did and use a staple gun to attach the fabric {pulling it tight so there are no wrinkles}.

Step 4:
If the paint is dry enough, apply a second coat of the spray paint.

Step 5:
I needed a trim piece to hide my staples so I found a rope type of trim and simply hot glued it into place.

Step 6: 
ASSEMBLE! Now have a seat and sip on something yummy...it is the weekend right?!

Read More
Uncategorized Nikki Uncategorized Nikki

The hutch we were "Pregnant" with...Real Life DIY

Once upon a time, when I was just staying home with my little man our friends asked if I would refinish some furniture for them. Of course, I didn't hesitate to say yes...and 1 month later I landed myself a full-time design position. 

I still wanted to do the furniture, so we started with their hutch. It was an old wooden piece that was given to them and they just wanted to see if it could be spruced up to look a little more "Pottery Barn" and a little less "visiting grandma's". 

After sanding and dis-assembling everything it was time to prime. Matt had gotten me a paint sprayer for Mother's Day and we were pumped to try it out! It was amazing! It covered the piece so quickly and coated it so much better than a paint brush. I am now a big fan, but I will say for small projects I don't use it because there are so many parts to clean after each coat. Anyway we were thinking this would be done in no time.

Long story short, the paint was having trouble sticking in some places and it ended up taking us 2 coats of primer and about 3-4 coats of paint {w/ primer in it} to get it covered. We also had to deal with our work hours {we could only work on weekends} and the weather {can't paint in rain or below 60...and it was winter...not smart}. 

After the paint cured I lightly sanded the areas that would naturally get more wear to make it look distressed. I also painted the back wall of the display cabinet a light gray to compliment her walls. Then we clear coated and re-assembled; adding some glass knobs we found at Hobby Lobby.

After almost 9 months we could finally gift them their hutch...only weeks before her second baby was due! 

That, my friends, is real life DIY; some projects are wins and some are giant fails. Most of mine eventually end up as wins, but not before tons of tears and little fails along the way...don't give up! If you want any tips on our process or how to achieve this look, feel free to contact me by clicking the link at the top of the screen.

xo,
Nikki

Read More
Uncategorized Nikki Uncategorized Nikki

Nursery Inspiration Board

Last week I hit the 20 week mark and we confirmed that we are indeed expecting a little girl. We celebrated by painting some of the walls in her nursery this past weekend while it "poured down" outside...it was supposed to...it didn't :/.  I had created an inspiration board a few weeks ago, then edited it...so here is the edited version. I'm sure a lot will change as the room progresses.
I am not someone who can do a totally themed or one-color room. I get bored waaayyy too quick.  Abram's nursery had an "adventure-ish" theme that started with a patterned fabric I liked, a saying, and a few dog paintings. I LOVE mixing several colors and patterns so things can be easily changed as time passes and tastes change.
This nursery was much harder to get the ideas rolling. I didn't want anything princessy, but still wanted to celebrate the "girl" spirit. Back in December, before I even knew I was having a girl, I saw some beautiful colored butterflies and moss displays at West Elm that I LOVED and came up with the theme "Make Believe" which could go in almost any direction.
I kinda combined Alice In Wonderland, secret garden, and glam/rock in my head. At first I was sold on fresh white walls and a bright floral focal wall behind the crib. Matt quickly vetoed that because of the thought of wall paper...bummer. If anyone wants a nursery like that I will be happy to help you design it; it would be so cool!  
Our family has been to the Hard Rock, in Vegas, several times and I have always loved the dark purple, moody, rock, velvet feel of it so I am trying to incorporate some of that. I love love love the Ikea chandelier because it reminds me of raindrops, but it might be too tall for our 8' ceilings so I am searching for an alternative. I am re-using the crib and glider from Abram's nursery so those won't add to the budget {if you don't count his big boy room update} ;)}. I am also painting a dresser that was given to me by a relative to save cost.
The nursery has so far evolved from more woodsy to a little more edgy, but I have some great ideas to tone down the drama. I really wanted to inspire her to dream and use her imagination. I also wanted to use floral, dots, and stripes to create a girly backdrop for some moodier pieces. I'm really into the idea of a deep purple and gold dresser right now, but that could change by next week.  I've also got some ideas for some cool textural items and imaginative decorations.
Stay tuned for updates...
Read More
Uncategorized Nikki Uncategorized Nikki

Weekend Project: Easter Garland


I love holidays and my mom always had a way to make them feel special. It wasn't necessarily the decor that she did; it was the activities that created the memories. The only holiday I really decorate full-out for is Christmas, but I like to put up a few things for the others that can be stored easily. I had NO easter stuff that wasn't a hand-me-down from my mom's "don't want" pile so I decided to whip up a couple quick and easy garlands to hang over the baskets this year. Who wouldn't love some yellow chicks and fluffy bunny tails for Easter!?

I'm not a fru-fru person so I wanted to keep it simple with these, and although I love paper garland, I have worked with them a bit on the photoshoots I used to design the backdrops for and they were sooo difficult to manage when not hanging up....enter the pom poms and foam shapes...so much easier.

I made these while Abram was napping and when he came downstairs he quickly pointed and said, "Balls" {his favorite}, then he sat there admiring them for a few minutes and it made the little bit of effort I put into making these worth it. He is the critic/admirer I care about the most.

Supplies:

  • Pack of any color {or mixed color} pom pom balls- got mine from Hobby Lobby
  • Foam shapes- You can either make your own or buy them from a store- I got these chicks from the  dollar section of Target, but have seen them at Hobby Lobby too
  • Some type of string- I used twine because I had it laying around, but any slim string will do
  • Scissors
  • A sewing needle with a hole large enough for your string
  • Hot glue if you feel like securing the pieces in their place
Approximate time to make both: 1-3 hours
For my target chicks garland: First, I poked Holes in the shapes with the scissors. I wanted the hole small and this was the easiest way. Then, I threaded the twine through the holes and spaced them until they looked good. DONE

For my "Peter Cotton Tail" garland: I threaded my twine through the needle, sat in my favorite living room chair, and just started poking it through each pom pom until the bag was empty...it was my most "old lady" moment in awhile and I sort of loved it! Then just space as far apart as you want and DONE!

If you feel like either garland has too much piece movement {or to store later}, just put some hot glue on each piece after they are spaced to secure.

xo, Nikki

Read More
Uncategorized Nikki Uncategorized Nikki

Weekend Project: Ikea Highchair Hack

I am ALWAYS working on projects. It is kinda like a bad habit because people will come over and be like, "I thought you had a degree in Interior Design; your house is a mess!" and I am like, "Ummm...I'm pregnant, have a toddler, oh and I have this horrible habit of doing five projects at once."

Being a busy working momma I totally understand the stress of doing nothing during the week, and then assigning the projects for the weekend. I always feel so much more accomplished when I can actually complete something in a weekend so I have decided to do a new series of posts that will show the projects I have done that can be completed in one weekend or less. I will try to post projects and crafts that only take a few hours, but some may take more...but let's face it, we want to ENJOY the weekend as well.

First on the list....

This is soooo late {blah blah same song, different day}, but I never did post about Abram's highchair and I am so in love with this thing that I feel it is a must! I had gotten one of those expensive, padded highchairs when I registered and was so excited about my registry score...but then I panicked hard! It was so padded and big. It would take up so much room in my kitchen and wasn't the most attractive thing on the planet. I could not afford those stylish expensive chairs though; it just wasn't in my budget at the time. Then I started reading reviews on padded chairs and how hard they are to clean EVERY MEAL, and then saw this post and my thoughts shifted as to what the perfect high chair would be for our family.

1) Easy to clean
2) My son was a hot baby, so extra padding= extra sweating= extra fussing
3) Affordable
4) As Compact as possible
5) Not an eyesore

Enter the $25 Ikea highchair from the post. I hated the legs so the spray paint idea was genius...not my genius {hers}, but everyone gets their inspiration from somewhere. I did a test of a copper, gold, and rubbed bronze legs. All three would be amazing so take a peek at this pic, but for our eating area I chose the gold. Just tape off the ball feet and spray.

After that was finished all I had to do was decide what decal would grace the back of the chair. I am obviously NOT a monogram person because it took about 3 seconds for me to realize that Abram's initials would be the Texas A&M logo and as LSU fans there was no way that was gonna happen. So the next 2 ideas were a fork and spoon decal {hard to find the right size}, or the "eat" decal which won. I got it from this etsy site, and had her do it custom, at 6.5" wide, and you can pick from her many colors to go with your decor {I chose mint}.

We LOVE it over 9 months later. Abram has had no problem sitting in this chair. The tray can detach, but we leave it attached most of the time. Whenever he gets older we can pull it up to the table without a tray. The legs come off if we have to bring it out of town. It is light as a feather so sometimes he gets living room meals if I feel lazy {don't judge}. I just clean it off quickly after every meal with the Honest Brand cleaner we have, but since it is white I sometimes have to bleach after foods like carrot juice. And for the big messes we swiftly carry it outside and  unleash the hose. AND since it is only $25 baby #2 can have her own ;).

Supplies:
$25 Ikea Highchair
Spray paint in color of your choice
Painter's tape
Vinyl decal of your choice
Approx. Time= around 4-6 hours depending on how long you let the paint dry
xo, Nikki

Read More
Uncategorized Nikki Uncategorized Nikki

A Fresh Start

It may not be minty fresh, but it is close...

Now that I am back I FINALLY did something I had been toying with for over a year; changing my blog's name to something more...me! You can read a little more about the new name by clicking on the "about us" tab at the top of the screen.

Oh and that brings me to the other change; this blog got a minor face lift! It is a little bit more fresh for Spring and has some different tabs so feel free to browse around. Now I am off to have a lazy {er} Sunday. Enjoy the rest of your weekend!

xo, Nikki

Read More
Uncategorized Nikki Uncategorized Nikki

Party Pics {Abram's Up/ Adventure Birthday Party}

From the moment I saw the movie "Up" I knew I wanted to use it as inspiration for Abram's birthday. I mean it has dogs, planes, adventure, maps...it is practically Abram's nursery with a little emotion and humor thrown in. I love the idea of something as simple as balloons in every color for a birthday, but I just couldn't stop there. 

I wanted to have cake pops for everyone since they would be easier to snack on while chasing toddlers around. My sis had made them before so I put her to work. They.Are.Hard. I will never ask her to do them again. She and my mom were stressing. BUT my idea worked out and we had cake pop balloons lifting our "up" house that I threw together.
I made Abram's cake and iced it and ordered my airplane topper from Etsy to make it look edible. Note to self; hire a caterer for your next party. 

The menu: 
Doggies in a blanket, 
Bone rice krispie treats,
leftover Halloween candy, 
Balloon cake pops,
Crush soda {etc}
and Jambalaya
Since he is only one I didn't want to stress myself out about a favor. I just decided to have a "make your own trail mix" bar for the kids of all ages to pick the snacks they like to take home. I found some muslin bags online and stamped them with a map stamp from Hobby Lobby. I had sweets for the older kids like m&ms and lots of easy snacks Abram eats regularly.

 I made a GIANT tissue paper garland that I hung over our island and the appetizers. It took some time, but I am going to split it up and put one in the game room and keep some for holidays or something. I also had a timeline of pics on the fireplace and Abram's Ikea tent and teepee set up for the young kids adventure areas.

Outside we had a small bounce house and giant blow up slide to keep the older kids busy. I'm pretty sure all had a good time!

Read More
Uncategorized Nikki Uncategorized Nikki

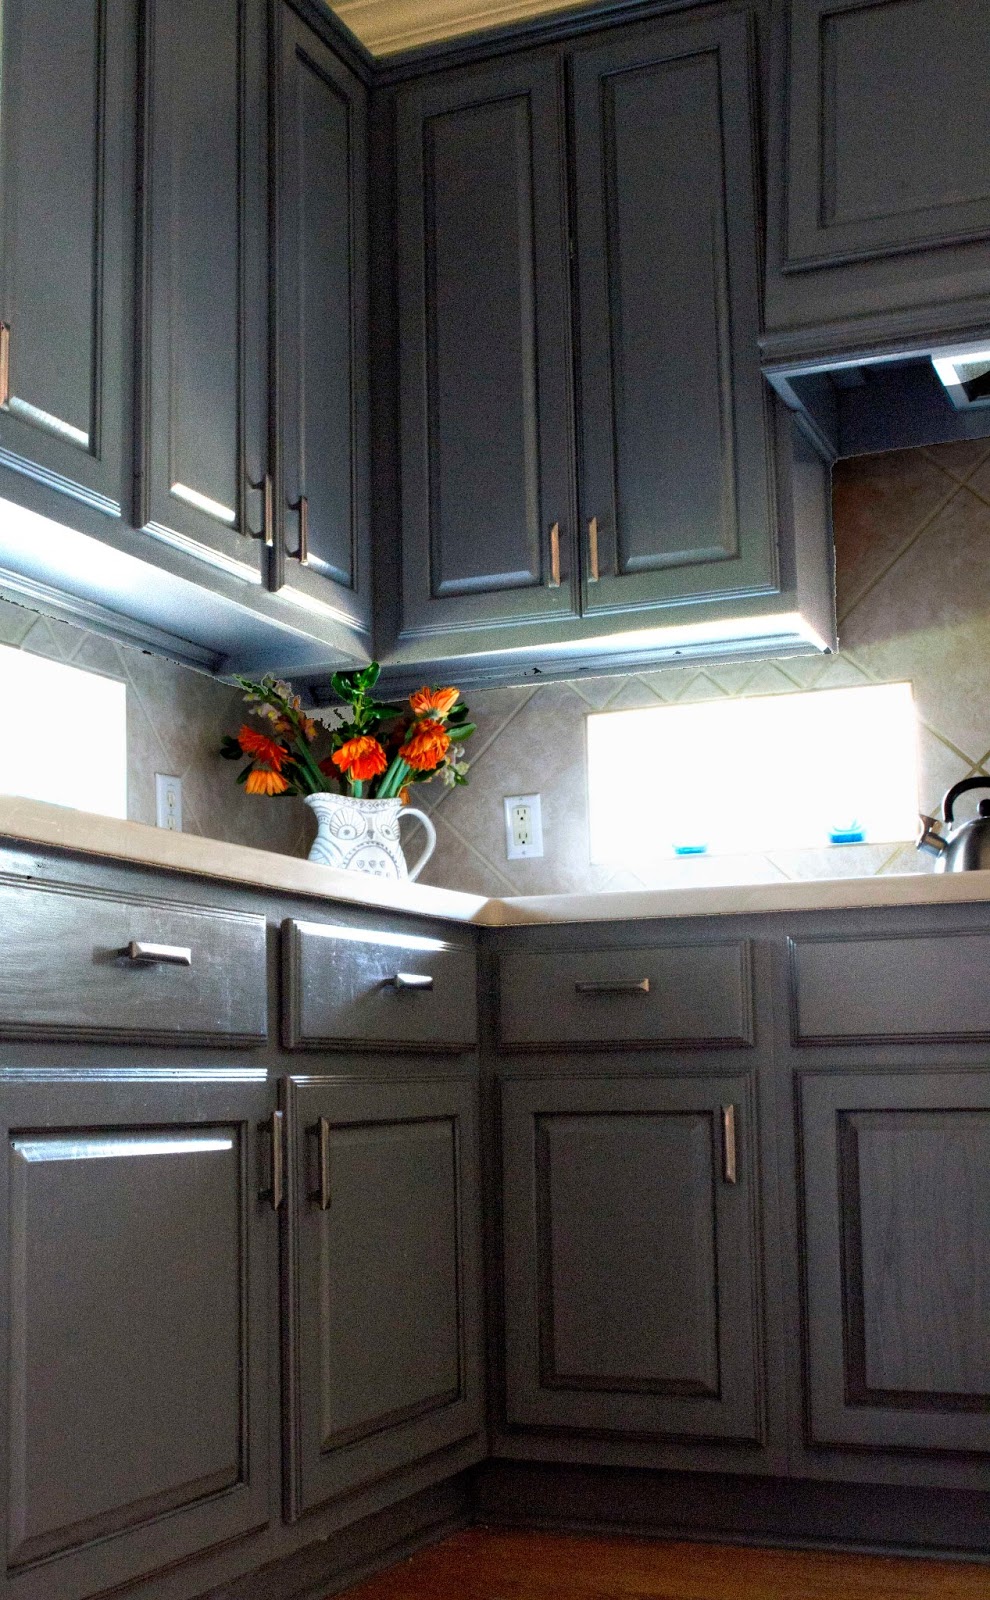
D.I.Y. Updated Kitchen Cabinets (Part 2) | Home Tour

       When I ended part one I was still sulking in the corner of my kitchen, staring at my DIY disaster. Luckily, there is an easier alternative to sanding...PAINT! I have never been opposed to painted cabinets but since we already had all white appliances, white counter tops, and white-ish back splash...white was out of the question. I didn't want something as dark as black. I LOVE colorful cabinets, but {like most of my projects} I consider both my "style" and resale to a certain extent since I know this will not be our house forever. Then I saw a picture of this home online and became obsessed with how good the dark gray with white counter tops looked. I didn't want them to look too modern for our traditional/contemporary style home, so I decided I would used a glaze to give them a little of an "antiqued" look.

       We had already sanded, so we no longer needed to do that step....just degrease and wipe them down with a damp cloth. We were advised to use an oil-based paint because it is more durable. Little did I know that latex paints have made big steps over the years....

TIP 1: As you take off your doors/drawers, find a way to number them in order to make sure you know where to put them back. Also put all hardware in a ziplock bag to make sure it doesn't get lost in the D.I.Y. craziness.
TIP 2: If you are painting your cabinets white, use a primer and then latex paint...oil-based white paints tend to yellow over time.
       Our oil-based paint was much thicker than the oil-based primers I have used; it took FOREVER to dry because it was cold. The brush strokes and bubbles from the paint were also showing when dry. 
TIP 3: If you have access to a paint sprayer, it may be messier but is well worth it since it saves you time and you avoid brush strokes {although I am sure they come with other problems}...my mom informed me once our job was done that she had one...not cool Debbie.
TIP 4: To thin oil based paint or primer in the winter and extend its drying time in the summer use a product called, Penetrol...it worked wonders! We couldn't see out brushstrokes afterwards.
TIP 5: Do NOT shake oil-based paint/primer to mix it before painting! Shaking will cause the bubbles, while stirring it with the paint sticks leaves it much smoother.
       We taped up the cabinets and rolled the paint on with a small foam roller made for cabinets, and would then quickly go over it with a high quality brush to take out any bubbles and fill in the corners/cracks. After each use we would just throw the roller and clean the brush WELL with mineral spirits. I also wore a respirator mask and gloves because I found out I was pregnant half way through this project and was cleared by my doctor to paint that way. Lightly sand in-between the two coats with a 220 grit sand paper. 
TIP 6: Take your time and use good lighting so you can see and correct any mistakes BEFORE the paint dries. 
       Read the back of your paint can to see how long you need to wait between coats. If I could do it again, I would do 2 coats of primer and 2 coats of latex in the color of my choice {semi-gloss for a little shine or satin for a more matte finish; sanding in between coats}.
       For antiquing, I bought one container of clear glaze from Lowes and mixed the amount directed with a sample size of the Valspar "almost black" paint because my gray was so dark. I antiqued the creases of the cabinets, drawers, and trim using a triangular sponge and a dry cloth for wiping. 
TIP 7: The more glaze you mix with the paint, the thinner it will go on...the less glaze you use with the paint, the thicker it will go on and less it will wipe off.
TIP 8: Experiment glazing with a small section {maybe hidden} to see what affect you want...keep a damp cloth with you to wipe off immediately if you don't like it.    
       To cap it off and make sure everything stays in place, I did two coats of Polyurethane, in Satin finish...always put a clear coat on furniture and cabinets. 
TIP 9: Make sure the clear coat you choose does not yellow over time, especially if you are using white/light paint.
       To avoid the modern gray/chrome/white kitchen look, we chose a dark metal/copper drawer pull from Lowes...and I LOVE it! Done and will NEVER do it again...at least in this house. Hope this helps you in your future kitchen re-do's. Painting the cabinets is an in-expensive way to update your kitchen quickly.
Paint color: Walmart- Chimney Smoke- Satin
Glaze from Lowes mixed with a sample of customized black valspar paint
Polyurethane water-based clear coat in Satin
Cabinet pulls: from Lowes
Recommended primers: Zinsser Oil-based Primer (high odor though) OR
Kilz Oil-based Odorless Primer (less odor)...or you can use water-based
Recommended Clear Coats: (based on others tutorial recommendations) Varathane Interior Water-based Polyurethane

Read More